Wednesday, June 25, 2014
prefectuninstaller: Uninstall Software Guides - How to Completely Remo...
prefectuninstaller: Uninstall Software Guides - How to Completely Remo...: Uninstall Software Guides - How to Completely Remove Programs with Software Removal Tips: How to Uninstall STOPzilla AVM 2013 – Learn the Be...
prefectuninstaller: prefectuninstaller: Uninstall Adobe Photoshop CS3
prefectuninstaller: prefectuninstaller: Uninstall Adobe Photoshop CS3: prefectuninstaller: Uninstall Adobe Photoshop CS3 : How to uninstall Adobe Photoshop CS3 with Perfect Uninstaller ? Method 1: Special Uins...
prefectuninstaller: How to remove avast completely
prefectuninstaller: How to remove avast completely: Have you ever encountered troubles with your Avast and need to remove Norton Internet Security 2010? Sometimes when you update Avast to the...
prefectuninstaller: How to easily avoid PC infections
prefectuninstaller: How to easily avoid PC infections: The single biggest factor in preventing a malware infection on your PC is YOU . You don’t need expert knowledge or special training.You ju...
prefectuninstaller: How to thoroughly remove Symantec Antivirus 10
prefectuninstaller: How to thoroughly remove Symantec Antivirus 10: When you scan your computer with Symantec Antivirus 10, it can find many threats in time and remove them from your computer. You may feel...
prefectuninstaller: How to Delete Windows Live Messenger in Security
prefectuninstaller: How to Delete Windows Live Messenger in Security: Are you helpless when you want to delete Windows Live Messenger ? Are you afraid of operating this process? What should remind you is that ...
prefectuninstaller: Uninstall Adobe Photoshop CS3
prefectuninstaller: Uninstall Adobe Photoshop CS3: How to uninstall Adobe Photoshop CS3 with Perfect Uninstaller ? Method 1: Special Uinstall Step1: Open Perfect Uninstaller and click Spec...
prefectuninstaller: You can Uninstall Google Chrome
prefectuninstaller: You can Uninstall Google Chrome: Google Chrome is a browser developed by Google which combines a minimal design with sophisticated technology so as to make the web much fas...
Tuesday, June 24, 2014
Uninstall Software Guides - How to Completely Remove Programs with Software Removal Tips: How to Uninstall STOPzilla AVM 2013 – Learn the Be...
Uninstall Software Guides - How to Completely Remove Programs with Software Removal Tips: How to Uninstall STOPzilla AVM 2013 – Learn the Be...: Are you searching for the most effective way about how to uninstall STOPzillaAVM 2013 in Windows 8? Do you want to remove STOPzilla AVM ...
Monday, June 23, 2014
You can Uninstall Google Chrome
Google Chrome is a browser developed by Google which combines a minimal design with sophisticated technology so as to make the web much faster and safer. To uninstall it, normally we can uninstall it with the two methods below:
1. uninstall it by going to Control Panel
. Click Start menu
. Add/Remove Programs list within Control Panel
. Highlight Google Chrome and click Remove to uninstall it
2. uninstall it with its own uninstall
click Start menu => All programs => locate Google Chrome => Uninstall Google Chrome
But most of the time, it is necessary for users to manually remove some files that left behind both in the drives or registry. For users that are not professional on computer, it is a little difficult to get this job finish. So is there any way to uninstall Google Chrome easily and completely? Of course, Perfect Uninstaller will help easily and thoroughly uninstall this browser.
With Perfect Uninstaller, you can uninstall this program directly from its directory. You can follow the steps below to accomplish it.
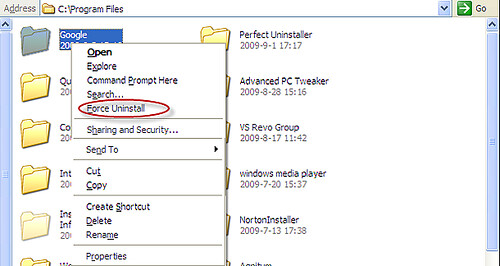
1) Find the folder in the drive directly where you locate Google Chrome.
2) Right click the directory and select Force Uninstall to begin the removal.

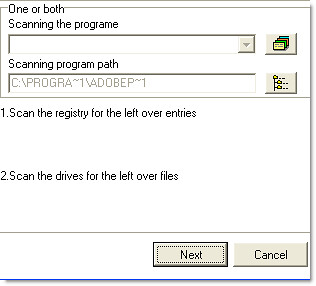
3) Follow the on-screen steps to finish the removal
. Perfect Uninstaller is scanning the registry for the left over entries

. Perfect Uninstaller is scanning the drives for left over files

. Perfect Uninstaller has found out all associated entries. Please click “Next” to completely uninstall it.

After the simple steps above, Google Chrome will be completely removed from the computer without nothing left in the drives and the registry.
1. uninstall it by going to Control Panel
. Click Start menu
. Add/Remove Programs list within Control Panel
. Highlight Google Chrome and click Remove to uninstall it
2. uninstall it with its own uninstall
click Start menu => All programs => locate Google Chrome => Uninstall Google Chrome
But most of the time, it is necessary for users to manually remove some files that left behind both in the drives or registry. For users that are not professional on computer, it is a little difficult to get this job finish. So is there any way to uninstall Google Chrome easily and completely? Of course, Perfect Uninstaller will help easily and thoroughly uninstall this browser.
With Perfect Uninstaller, you can uninstall this program directly from its directory. You can follow the steps below to accomplish it.
1) Find the folder in the drive directly where you locate Google Chrome.
2) Right click the directory and select Force Uninstall to begin the removal.
3) Follow the on-screen steps to finish the removal
. Perfect Uninstaller is scanning the registry for the left over entries
. Perfect Uninstaller is scanning the drives for left over files
. Perfect Uninstaller has found out all associated entries. Please click “Next” to completely uninstall it.
After the simple steps above, Google Chrome will be completely removed from the computer without nothing left in the drives and the registry.
Uninstall Software Guides - How to Completely Remove Programs with Software Removal Tips: AOL Toolbar Won Uninstall - How to Totally Remove ...
Uninstall Software Guides - How to Completely Remove Programs with Software Removal Tips: AOL Toolbar Won Uninstall - How to Totally Remove ...: AOL Toolbar won uninstall in Windows 8.1 since it eats up many system resources? Have you ever tried to uninstall AOL toolbar because yo...
Sunday, June 22, 2014
Uninstall Adobe Photoshop CS3
How to uninstall Adobe Photoshop CS3 with Perfect Uninstaller?
Method 1: Special Uinstall
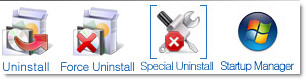
Step1: Open Perfect Uninstaller and click Special Uninstall to open a prompt.
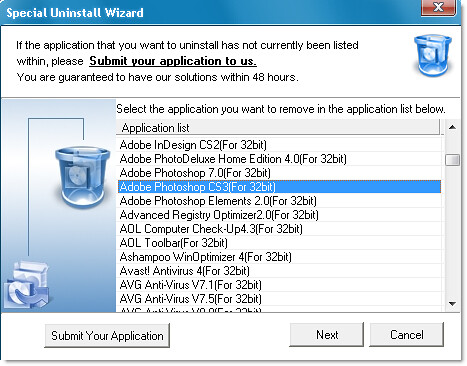
Step2: Locate Adobe Photoshop CS3 in the application list and then click Next.
Step3: Click Next and follow the onscreen hints to uninstall Adobe Photoshop CS3 completely.
Method 2: Force Uninstall
Step1: Find the folder directly in the hard drive where you locate Adobe Photoshop CS3, such as, C:\program files \ Adobe Photoshop CS3.
Step2: Right-click the folder to select “Force Uninstall” to start.

Step3: Click Next and follow the onscreen hints to uninstall Adobe Photoshop CS3 completely.
Method 1: Special Uinstall
Step1: Open Perfect Uninstaller and click Special Uninstall to open a prompt.
Step2: Locate Adobe Photoshop CS3 in the application list and then click Next.
Step3: Click Next and follow the onscreen hints to uninstall Adobe Photoshop CS3 completely.
Method 2: Force Uninstall
Step1: Find the folder directly in the hard drive where you locate Adobe Photoshop CS3, such as, C:\program files \ Adobe Photoshop CS3.
Step2: Right-click the folder to select “Force Uninstall” to start.
Step3: Click Next and follow the onscreen hints to uninstall Adobe Photoshop CS3 completely.
How to Delete Windows Live Messenger in Security
Are you helpless when you want to delete Windows Live Messenger? Are you afraid of operating this process? What should remind you is that if you delete Windows Live Messenger in an incorrect way, the process of uninstalling will cause an unexpected problem. Therefore, you have to be cautious to delete Windows Live Messenger or other applications on your computer.
How to delete Windows Live Messenger in Security?
The most conventional method is removal through the Add/Remove Programs Control Panel. Unfortunately, most of the time and most of users who try to remove Windows Live Messenger will inevitably run into obstacles: Windows Live Messenger does not appear in the list of installed updates. Or even though you have uninstalled it, it still may start up automatically when you log on.
This is because the registry entries and the delete Windows Live Messenger related files respectively remain hidden in the nooks and corners of your registry and hard drives.
Ok, let’s try the alternative steps to wipe out Windows Live Messenger:
1. Open the start menu (either by using your cursor, or pressing the Windows button on your keyboard).
2. Click “Run…” if you are using XP. If you are using Vista, type “Run” into the Start Search box, and open “Run”.
3. Click “OK” or press Enter on your keyboard.
4. Click the “Yes” button, when you are prompted to restart your computer.
Does this manual operation sound complicated or inconvenient to you? Please don’t worry about it. Please remember that every cloud has a silver lining. Let’s use one better and easier Uninstaller to help you get rid of Windows Live Messenger automatically and safely. Perfect Uninstaller is a tool that can wipe out the applications the left registry files in a better and easier way, so that to protect your PC from corrupted registry errors in security.
Automatically delete Windows Live Messenger by Perfect Uninstaller in Security
This uninstaller tool can make sure all the now-defunct Registry entries and related files eliminate automatically with a few clicks. The process will take a very short period of time. It is absolutely a reliable program for you to choose!
How to delete Windows Live Messenger with Perfect Uninstall in Security
Step 1: Free to Download and install Perfect Uninstaller.
Step 2: Boot your PC in safe mode and run Perfect Uninstaller.
Step 2: Boot your PC in safe mode and run Perfect Uninstaller.
Step 3: Click Special Uninstall to open the application list as below.
Step 4: Click Windows Live Messenger and click Next.
Step 5: Follow a few onscreen instructions to complete the next two or three steps.Step 6: Restarting your computer is required to complete removal.
Completely uninstall Kaspersky Internet Security 2010
Kaspersky Antivirus 2010 and Kaspersky Internet Security 2010 Trial was released months ago. As most of you agree with me, Kaspersky is one of the highest rated Antivirus software. More and more people are choosing it over other antivirus softwares.
But, you may not be interested in continuing Kaspersky 2010 and want to uninstall Kaspersky 2010 from their PC / Laptop. However, you should have known better than me that the Add/Remove Programs function in Control Panel will not delete the related files, folders, directories and the registry entries even if the Kaspersky has been uninstalled successfully. In this case, if you want to uninstall Kaspersky Internet Security 2010 by any reason, you can perform the following actions:
Uninstall Kaspersky using Setup Wizard.
Step 1 Close all programs including Kaspersky. If the Kaspersky application is running, please right-click the K icon in the left bottom corner, and then select Exit.
Step 1 Click Start, Click All programs and find the Kaspersky internet security 2010.
Step 2 Click Modify, Repair or Remove.
Step 2 Select the Remove icon in the open dialog window of the Setup Window.
Step 3 Select one remove variant:
- Complete uninstall - choose this variant if you want to fully remove the application and you are not going to use it in future.
- Save application objects - choose this variant if you want to update the application version. For it delete old program files and registry entries and then run installation of the new version. The following objects are suggested to be saved:
- Keep activation data
- Anti-Spam database (if the Anti-Spam component was deployed and trained while in use)
- Keep backup and quarantine files (the option is available only if malicious objects were detected and were backed up during previous sessions)
- Keep protection settings (user settings of the Kaspersky Internet Security components)
- Keep iSwift and iChecker data (use to accelerate the application work)
Step 4 In the Confirm window confirm or cancel the application uninstallation. Click Remove to continue Step 5 Wait till program files and registry keys are removed
Step 6 PC should be restarted after removal of Kaspersky Internet Security 2010 to finish the uninstallation process correctly. It is necessary to uninstall the application system drives correctly. You can restart the computer immediately or delay restart and restart the computer manually. Once the computer is restarted, the application is completely uninstalled from your PC.
I have seen lots of users are facing issues while uninstalling Kaspersky Internet Security 2010 with the standard method above because it’s really too complicated. Even if you are a computer geek, it will take you a lot of time to completely get Kaspersky deleted from the computer.
Fortunately, here is a very useful tool Perfect Uninstaller that can easily uninstall Kaspersky Internet Security 2010 in seconds. Not only Kaspersky can be simply removed, but also those unwanted programs and applications that are very hard to get rid of completely. Perfect Uninstaller can help you to uninstall them through the step-by-step wizard.
A thorough removal of Kaspersky with Perfect Uninstaller
1. Download and install Perfect Uninstaller
2. Launch the program and select Kaspersky Internet Security 2010
3. Click Uninstall to completely get rid of Kaspersky
Thursday, June 19, 2014
You can uninstall STOPzilla
When trying to uninstall STOPzilla in normal ways, Windows Add/Remove programs utility or its packaged uninstaller, users will always get pop-ups indicating that they do not have permission of the system administrator to perform the uninstall or can not uninstall due to a fatal error. That stops them from successfully accomplishing the removal. It will be very annoyed to get such uninstall problems, but Force Uninstall it with Perfect Uninstaller will easily get rid of it from the computer.
Before uninstalling STOPzilla with Perfect Uninstaller, first you have to make all STOPzilla folders visible.
A. Open My Compter.
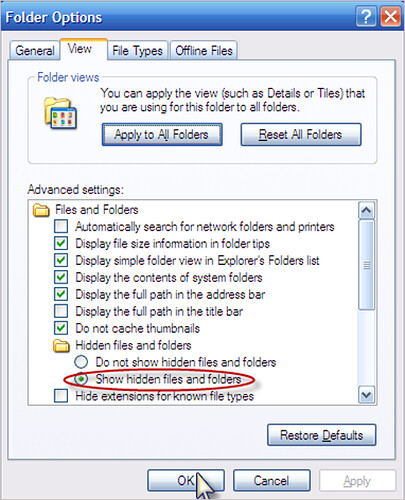
B. Click Tools and then Folders Option
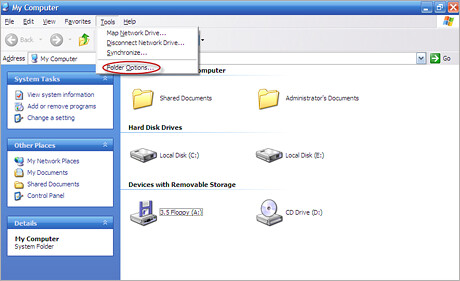
C. Click View and the tick the tab ” Show Hidden files and folders”
After the above processed, we can see that STOPzilla always has three directories:
1) C:\Program Files\STOPzilla!
2) C:\Program Files\Common Files\iS3
3) C:\Documents and Settings\All Users\Application Data\STOPzilla!
So it is necessary for you to Force Uninstall three times to make sure a complete uninstallation.
Force Uninstall STOPzilla
Step one: Quit STOPzilla from the right bottom of the desktop. To make it easy, you can directly get into windows safe mode to totally close the running programs.

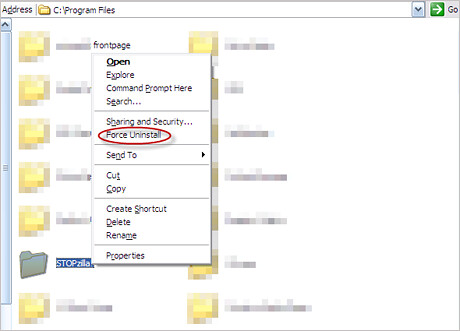
Steps two: Navigate to the C:\Program Files\STOPzilla!, right click the folder “STOPzilla!” and then select Force Uninstall to begin the removal.

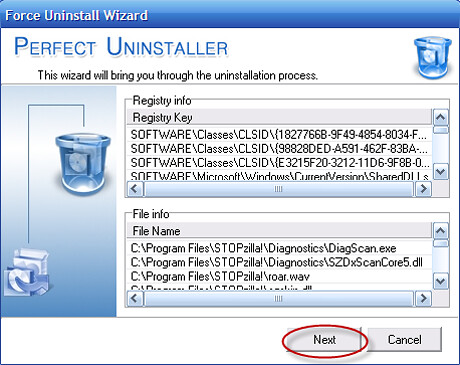
Step three: Click Next to proceed the removal when Perfect Uninstaller has found all associated entries.
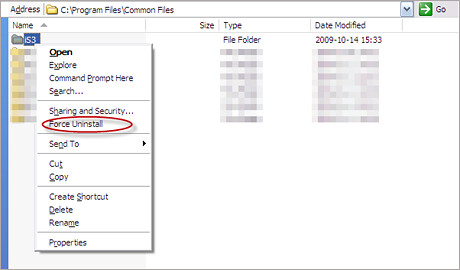
Step four: Navigate to the C:\Program Files\Common Files\iS3, right click the folder “iS3″ and then select Force Uninstall to begin the removal.
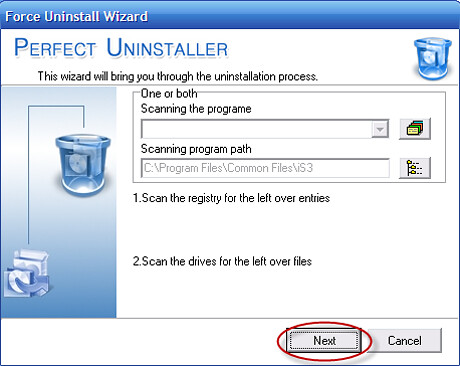
Step five: Perfect Uninstaller has found all related entries,click Next to continue.
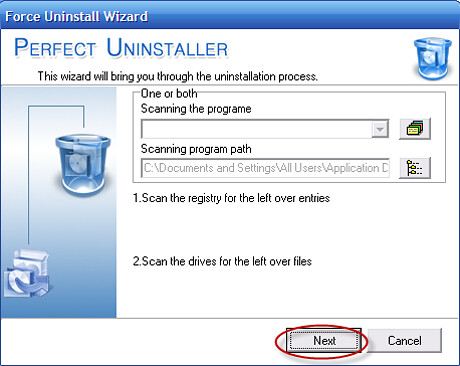
Step six: Navigate to the C:\Documents and Settings\All Users\Application Data\STOPzilla!, right click the folder “STOPzilla!” and then select Force Uninstall to begin the removal.

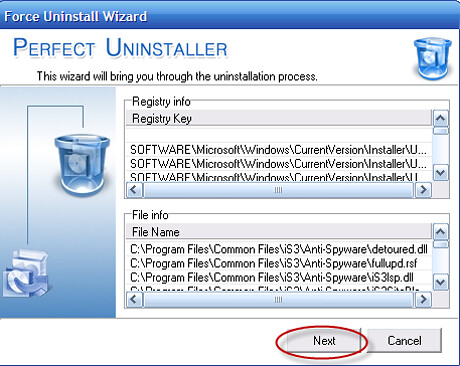
Step seven. Click Next when Perfect Uninstaller has found all associated entries.

Step eight. Follow the on-screen steps to finish the removal.
With the uninstall processes above, you can thoroughly uninstall STOPzilla from your computer without difficulties,no matter it is a full or corrupted version.
Before uninstalling STOPzilla with Perfect Uninstaller, first you have to make all STOPzilla folders visible.
A. Open My Compter.
B. Click Tools and then Folders Option
C. Click View and the tick the tab ” Show Hidden files and folders”
After the above processed, we can see that STOPzilla always has three directories:
1) C:\Program Files\STOPzilla!
2) C:\Program Files\Common Files\iS3
3) C:\Documents and Settings\All Users\Application Data\STOPzilla!
So it is necessary for you to Force Uninstall three times to make sure a complete uninstallation.
Force Uninstall STOPzilla
Step one: Quit STOPzilla from the right bottom of the desktop. To make it easy, you can directly get into windows safe mode to totally close the running programs.
Steps two: Navigate to the C:\Program Files\STOPzilla!, right click the folder “STOPzilla!” and then select Force Uninstall to begin the removal.
Step three: Click Next to proceed the removal when Perfect Uninstaller has found all associated entries.
Step four: Navigate to the C:\Program Files\Common Files\iS3, right click the folder “iS3″ and then select Force Uninstall to begin the removal.
Step five: Perfect Uninstaller has found all related entries,click Next to continue.
Step six: Navigate to the C:\Documents and Settings\All Users\Application Data\STOPzilla!, right click the folder “STOPzilla!” and then select Force Uninstall to begin the removal.
Step seven. Click Next when Perfect Uninstaller has found all associated entries.
Step eight. Follow the on-screen steps to finish the removal.
With the uninstall processes above, you can thoroughly uninstall STOPzilla from your computer without difficulties,no matter it is a full or corrupted version.
How to easily avoid PC infections
The single biggest factor in preventing a malware infection on your PC is YOU.
You don’t need expert knowledge or special training.You just need vigilance to avoid downloading and installing anything you do not understand or trust, no matter how tempting might be!
Below you can read , some tips on how to easily avoid a computer infection.Follow them and we can guarantee , that you’ll never have to deal with an compromised PC.
1. Avoid running programs that where downloaded from a untrustworthy source or don’t have a digital signature.
Before clicking the ‘Run‘ button make sure you know what the program is and always keep in mind from where you got it.
Everyone has seen this type of alert however most of the user for a reason or another, decide to ignore it and allow the file to run without any kind of restriction.
Files that don’t have a digital signature or were downloaded from a unknown source should always be treated as dangerous.
I strongly recommend that you check each file before allowing it to run :
1.Scan it with your antivirus.
2.Scan it with an on-demad scanner (programs that you can install on your computer and use them only for scans) like HitmanPro or Malwarebytes Anti-Malware.
3.Submit the file to virustotal.com,a site which will scan your program with the 43 known antivirus engines.
Even so it’s strongly recommended that you run the file in a virtual environment like Sandboxie or Bufferzone until you can decide if the file is malicious or not.
2.Avoid keygens,cracks and other warez
Keygen , cracks and patches are the most common ways of getting your PC infected.
I strongly advise you to avoid them, as there is little quality control in the world of illegal software, and it is easy for an attacker to name a piece of malware after a popular movie, album, or program to tempt you into downloading it.
3. Download files only from trusted sources.
You can drastically reduce the risk of an infection by knowing what and from where you are downloading a file.
We recommend that you install a site advisor like Web of Trust or Norton Safe Web, which will help you decide if the site is trustworthy or not.
As a general rule it’s recommended that you download files from known and reputable sites that have confirmed that the download is malware free.
If you are unsure about the quality of a download, leave the site and research the software you are being asked to install. If it is OK, you can always come back to site and install it. If it is not OK, you will avoid a malware headache.
4. Use common sense while online
Finding something on the internet does not guarantee that it is true. Anyone can publish information online, so before accepting a statement as fact or taking action, verify that the source is reliable.
If it’s sounds to good to be truth then most likely is!
You’ll not win the lottery and you’ll not get an amazing prize on the Internet so don’t fall for this type of scams.
Ignore emails or websites who promise you a great prize as there is always a catch behind this type of promises.
Completing a survey will not grant you a iPhone or 1000$ instead it will give the cyber criminals your personal details.
5. Keep your computer up-to-date and secure
Always update your OS or software when an update is available as this can greatly reduce the chances of an exploit.
Also keep in mind that a simple antivirus engine doesn’t do the job anymore, you need to have a layered system protection as malware threats are constantly changing and improving thus making the antivirus engine obsolete.
An antivirus engine, firewall , host intrusion prevention system, a site advisor and sandbox are security layers which every computer needs to be safe in today’s world.
You can build up your malware defenses with our help by starting a thread in our Security Configuration Wizard forum.
Another common mistake made by Windows users is to disable the User Account Control.
The way Microsoft found to keep security, comfort and function in balance by integrating User Account Control (UAC) that seamlessly, is one of the benefits Windows 7 offers.When using a Limited/Standard User Account , your user profile might still getting compromised, but not Windows 7 basic operating system in the background. Even your profile got hit, all your pictures, MP3 files or documents can be restored easily by logging in to another account that is not yet compromised.
I strongly advise you to let this Windows feature enabled and pay a very close attention to this pop-ups , as this could save your PC from an infection.
Other Quick Security Tips :
Uninstall Java if you don’t really need it as this is one of the most exploited programs.
Use complex passwords for you online accounts – Passwords should be a minimum of eight characters and contain a combination of letters (uppercase/lowercase), numbers, and special symbols
Do not open email attachments from unknown sources or files sent through an instant messenger
Don’t give out your details to people who don’t have a legitimate need to know them.
While on social networks it’s best to be reserved when allowing people to see your profile or updates
Monday, June 16, 2014
prefectuninstaller: How to Delete Windows Live Messenger in Security
prefectuninstaller: How to Delete Windows Live Messenger in Security: Are you helpless when you want to delete Windows Live Messenger ? Are you afraid of operating this process? What should remind you is that ...
How to Delete Windows Live Messenger in Security
Are you helpless when you want to delete Windows Live Messenger? Are you afraid of operating this process? What should remind you is that if you delete Windows Live Messenger in an incorrect way, the process of uninstalling will cause an unexpected problem. Therefore, you have to be cautious to delete Windows Live Messenger or other applications on your computer.
How to delete Windows Live Messenger in Security?
The most conventional method is removal through the Add/Remove Programs Control Panel. Unfortunately, most of the time and most of users who try to remove Windows Live Messenger will inevitably run into obstacles: Windows Live Messenger does not appear in the list of installed updates. Or even though you have uninstalled it, it still may start up automatically when you log on.
This is because the registry entries and the delete Windows Live Messenger related files respectively remain hidden in the nooks and corners of your registry and hard drives.
Ok, let’s try the alternative steps to wipe out Windows Live Messenger:
1. Open the start menu (either by using your cursor, or pressing the Windows button on your keyboard).
2. Click “Run…” if you are using XP. If you are using Vista, type “Run” into the Start Search box, and open “Run”.
3. Click “OK” or press Enter on your keyboard.
4. Click the “Yes” button, when you are prompted to restart your computer.
Does this manual operation sound complicated or inconvenient to you? Please don’t worry about it. Please remember that every cloud has a silver lining. Let’s use one better and easier Uninstaller to help you get rid of Windows Live Messenger automatically and safely. Perfect Uninstaller is a tool that can wipe out the applications the left registry files in a better and easier way, so that to protect your PC from corrupted registry errors in security.
Automatically delete Windows Live Messenger by Perfect Uninstaller in Security
This uninstaller tool can make sure all the now-defunct Registry entries and related files eliminate automatically with a few clicks. The process will take a very short period of time. It is absolutely a reliable program for you to choose!
How to delete Windows Live Messenger with Perfect Uninstall in Security
Step 1: Free to Download and install Perfect Uninstaller.
Step 2: Boot your PC in safe mode and run Perfect Uninstaller.
Step 2: Boot your PC in safe mode and run Perfect Uninstaller.
Step 3: Click Special Uninstall to open the application list as below.
Step 4: Click Windows Live Messenger and click Next.
Step 5: Follow a few onscreen instructions to complete the next two or three steps.Step 6: Restarting your computer is required to complete removal.
prefectuninstaller: Uninstall Weather Channel Desktop 6
prefectuninstaller: Uninstall Weather Channel Desktop 6: In many cases, we can uninstall Weather Channel Desktop 6 directly from Add/Remove programs and Start/All Programs/Weather Channel/Uninstall...
Uninstall Weather Channel Desktop 6
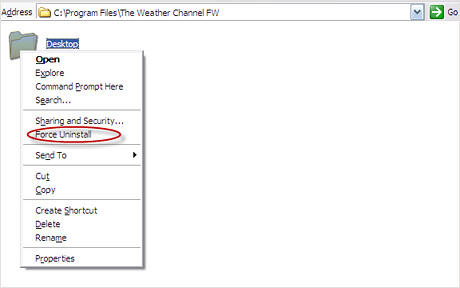
In many cases, we can uninstall Weather Channel Desktop 6 directly from Add/Remove programs and Start/All Programs/Weather Channel/Uninstall. But some times, it becomes difficult to fully uninstall the program from the computer when corrupted. If having Perfect Uninstaller in hand, you can quickly uninstall Weather Channel Desktop 6 because the Force Uninstall function allows us to directly uninstall programs from their folders. This is particularly useful in uninstalling any corrupted applications.
Now, Force Uninstall Weather Channel Desktop 6
1) Quit Weather Channel Desktop 6 from the right bottom of the desktop.
2) Navigate to the directory C:\Program Files\The Weather Channel FW, right click the folder “Desktop” and select “Force Uninstall” from the right-click menu. Perfect Uninstaller will launch instantly as follows, press “Next” to go.
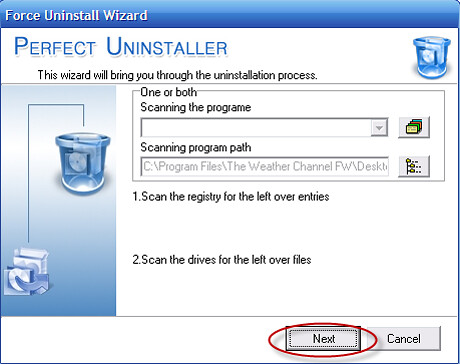
3) Perfect Uninstaller has found all associated entries, press “Next” to remove.

With the processed above, you can completely uninstall Weather Channel Desktop 6 from your computer, even if it is a corrupted version. But it is a full version, it is greatly recommended that you can first select to uninstall it with the Uninstall function.
Now, Force Uninstall Weather Channel Desktop 6
1) Quit Weather Channel Desktop 6 from the right bottom of the desktop.
2) Navigate to the directory C:\Program Files\The Weather Channel FW, right click the folder “Desktop” and select “Force Uninstall” from the right-click menu. Perfect Uninstaller will launch instantly as follows, press “Next” to go.
3) Perfect Uninstaller has found all associated entries, press “Next” to remove.
With the processed above, you can completely uninstall Weather Channel Desktop 6 from your computer, even if it is a corrupted version. But it is a full version, it is greatly recommended that you can first select to uninstall it with the Uninstall function.
Sunday, June 15, 2014
prefectuninstaller: How to Delete Windows Live Messenger in Security
prefectuninstaller: How to Delete Windows Live Messenger in Security: Are you helpless when you want to delete Windows Live Messenger? Are you afraid of operating this process? What should remind you is that i...
Thursday, June 12, 2014
prefectuninstaller: How to uninstall Windows Media Player 11 completel...
prefectuninstaller: How to uninstall Windows Media Player 11 completel...: Unlike other uninstallers, Windows Media Player 11 itself does not have an uninstall option, which makes it a little difficult to be uninsta...
How to uninstall Windows Media Player 11 completely
Unlike other uninstallers, Windows Media Player 11 itself does not have an uninstall option, which makes it a little difficult to be uninstalled. Normally, we can uninstall Windows Media Player 11 from Windows Add/Remove Programs utility if it is listed there, as what you can see in the screenshot below.
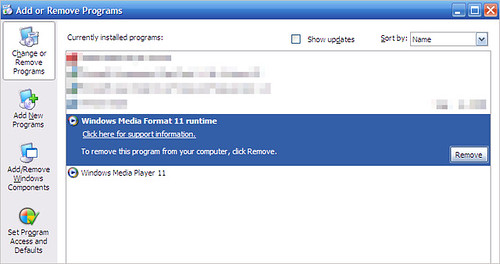
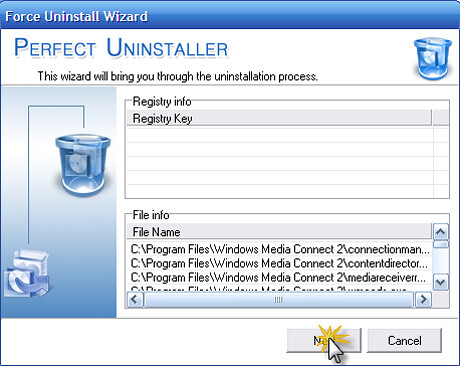
But if it is not located there or corrupted, Force Uninstall it with Perfect Uninstaller in safe mode will help you thoroughly remove it without difficulties. Even though listed in the Add/Remove Programs list, it is also recommended to uninstall Windows Media Player 11 with Perfect Uninstaller to ensure a complete uninstallation.
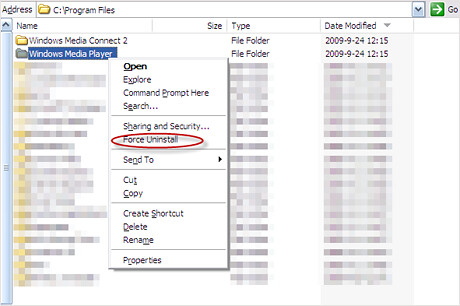
Please note that two directories of Windows Media Player 11 are as follows:
C:\Program Files\Windows Media Player
C:\Program Files\Windows Media Connect 2
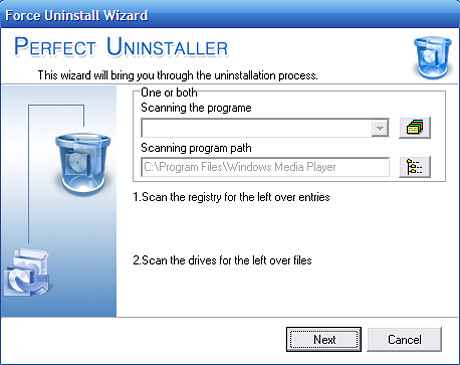
Step one: Navigate to the directory C:\Program Files\Windows Media Player, and then right click the folder to select “Force Uninstall” to begin the removal.
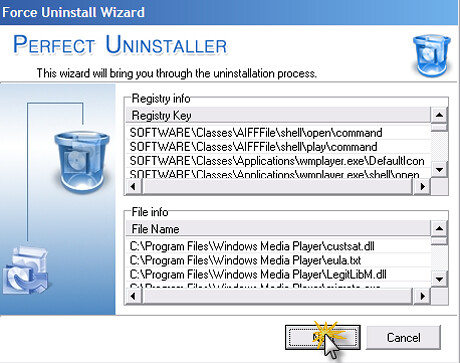
Step Two: Click “Next” to remove to remove all associated entries of Windows Media Player ll that Perfect Uninstaller has found.
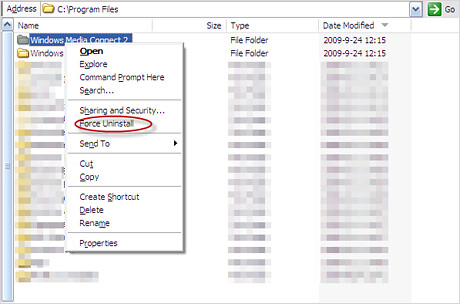
Step three: Navigate to the directory C:\Program Files\Windows Media Connect 2, and then right click the folder to select “Force Uninstall” to begin the removal.
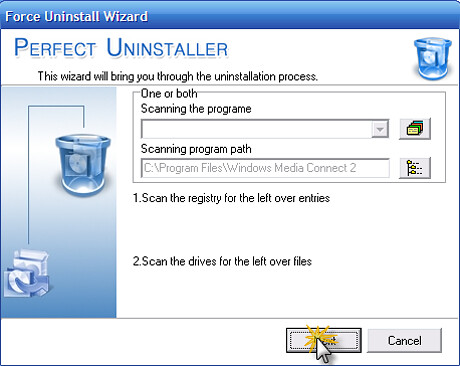
Then you can follow the on-screen steps to finish the removal.
With Perfect Uninstaller in hand, you can not only completely uninstall Windows Media Player 11, but also all other versions of Windows Media Player from windows XP.
But if it is not located there or corrupted, Force Uninstall it with Perfect Uninstaller in safe mode will help you thoroughly remove it without difficulties. Even though listed in the Add/Remove Programs list, it is also recommended to uninstall Windows Media Player 11 with Perfect Uninstaller to ensure a complete uninstallation.
Please note that two directories of Windows Media Player 11 are as follows:
C:\Program Files\Windows Media Player
C:\Program Files\Windows Media Connect 2
Step one: Navigate to the directory C:\Program Files\Windows Media Player, and then right click the folder to select “Force Uninstall” to begin the removal.
Step Two: Click “Next” to remove to remove all associated entries of Windows Media Player ll that Perfect Uninstaller has found.
Step three: Navigate to the directory C:\Program Files\Windows Media Connect 2, and then right click the folder to select “Force Uninstall” to begin the removal.
Then you can follow the on-screen steps to finish the removal.
With Perfect Uninstaller in hand, you can not only completely uninstall Windows Media Player 11, but also all other versions of Windows Media Player from windows XP.
prefectuninstaller: How to uninstall Spybot - Search & Destroy
prefectuninstaller: How to uninstall Spybot - Search & Destroy: It is very easy to uninstall Spybot - Search & Destroy with Perfect Uninstaller, especially when it is corrupted (be not completely unin...
How to uninstall Spybot - Search & Destroy
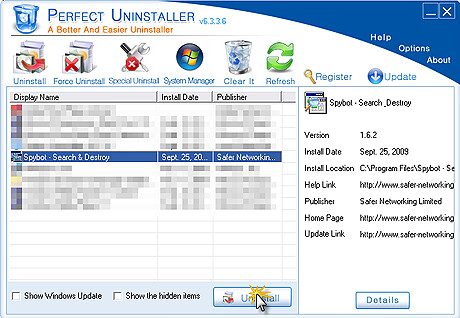
It is very easy to uninstall Spybot - Search & Destroy with Perfect Uninstaller, especially when it is corrupted (be not completely uninstalled before or not in the Add/Remove Programs). Here, we take version1.6.2 as an example to tell how to uninstall Spybot - Search & Destroy easily with Perfect Uninstaller.
Method one: Uninstall it with Uninstall function.
1)Run Perfect Uninstaller
2)Highlight Spybot - Search & Destroy in the Display Name list.
3)Click “Uninstall” button to begin the removal.
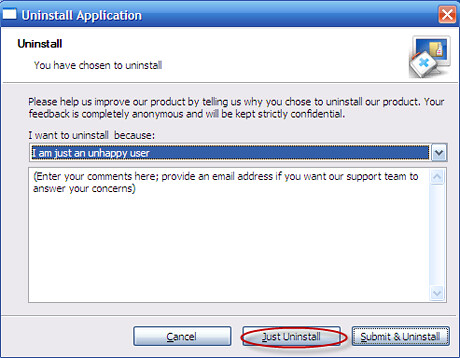
4)Click “Just Uninstall” button when the below window appear.
5)Follow the on-screen steps to finish the removal.
But if the program is not in the list after you run Perfect Uninstaller, what should you do? Don’t worry, Force Uninstall will help you do the job easily.
Mwthod Two: Force Uninstall Spybot Search & Destroy
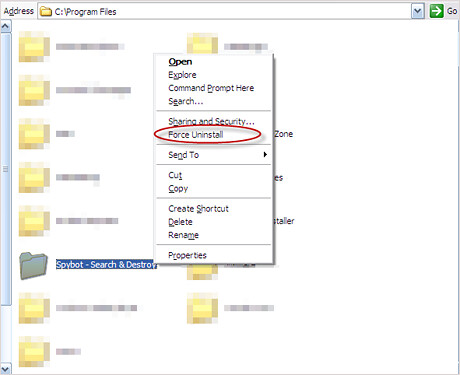
1) Find the folder directly in the hard drive where you locate Spybot Search & Destroy, for example, C:\Program Files\Spybot - Search & Destroy.
2) Click the folder and then select “Force Uninstall” to begin the removal.

3) Click Next when Perfect Uninstaller has found all associated entries both in the drives and registry.
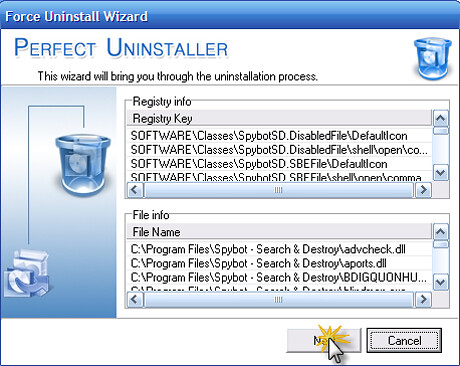
4) Then follow the on-screen steps to finish the uninstallation processes.
With the very easy uninstallation processes above, Spybot - Search & Destroy 1.6.2 will be completely uninstalled from the computer. And the method above is also available to uninstall any version of Spybot Search & Destroy.
Method one: Uninstall it with Uninstall function.
1)Run Perfect Uninstaller
2)Highlight Spybot - Search & Destroy in the Display Name list.
3)Click “Uninstall” button to begin the removal.
4)Click “Just Uninstall” button when the below window appear.
5)Follow the on-screen steps to finish the removal.
But if the program is not in the list after you run Perfect Uninstaller, what should you do? Don’t worry, Force Uninstall will help you do the job easily.
Mwthod Two: Force Uninstall Spybot Search & Destroy
1) Find the folder directly in the hard drive where you locate Spybot Search & Destroy, for example, C:\Program Files\Spybot - Search & Destroy.
2) Click the folder and then select “Force Uninstall” to begin the removal.
3) Click Next when Perfect Uninstaller has found all associated entries both in the drives and registry.
4) Then follow the on-screen steps to finish the uninstallation processes.
With the very easy uninstallation processes above, Spybot - Search & Destroy 1.6.2 will be completely uninstalled from the computer. And the method above is also available to uninstall any version of Spybot Search & Destroy.
Wednesday, June 11, 2014
prefectuninstaller: Uninstall ESET Smart Security 4
prefectuninstaller: Uninstall ESET Smart Security 4: To uninstall ESET Smart Security 4 from the computer, the normal and direct way is to uninstall it with its own uninstaller. But after the ...
prefectuninstaller: How to Delete Windows Live Messenger in Security
prefectuninstaller: How to Delete Windows Live Messenger in Security: Are you helpless when you want to delete Windows Live Messenger? Are you afraid of operating this process? What should remind you is that i...
How to Delete Windows Live Messenger in Security
Are you helpless when you want to delete Windows Live Messenger? Are you afraid of operating this process? What should remind you is that if you delete Windows Live Messenger in an incorrect way, the process of uninstalling will cause an unexpected problem. Therefore, you have to be cautious to delete Windows Live Messenger or other applications on your computer.
The most conventional method is removal through the Add/Remove Programs Control Panel. Unfortunately, most of the time and most of users who try to remove Windows Live Messenger will inevitably run into obstacles: Windows Live Messenger does not appear in the list of installed updates. Or even though you have uninstalled it, it still may start up automatically when you log on.
This is because the registry entries and the delete Windows Live Messenger related files respectively remain hidden in the nooks and corners of your registry and hard drives.
Ok, let’s try the alternative steps to wipe out Windows Live Messenger:
1. Open the start menu (either by using your cursor, or pressing the Windows button on your keyboard).
2. Click “Run…” if you are using XP. If you are using Vista, type “Run” into the Start Search box, and open “Run”.
3. Click “OK” or press Enter on your keyboard.
4. Click the “Yes” button, when you are prompted to restart your computer.
Does this manual operation sound complicated or inconvenient to you? Please don’t worry about it. Please remember that every cloud has a silver lining. Let’s use one better and easier Uninstaller to help you get rid of Windows Live Messenger automatically and safely. Perfect Uninstaller is a tool that can wipe out the applications the left registry files in a better and easier way, so that to protect your PC from corrupted registry errors in security.
Automatically delete Windows Live Messenger by Perfect Uninstaller in Security
This uninstaller tool can make sure all the now-defunct Registry entries and related files eliminate automatically with a few clicks. The process will take a very short period of time. It is absolutely a reliable program for you to choose!
How to delete Windows Live Messenger with Perfect Uninstall in Security
Step 1: Free to Download and install Perfect Uninstaller.
Step 2: Boot your PC in safe mode and run Perfect Uninstaller.
Step 2: Boot your PC in safe mode and run Perfect Uninstaller.
Step 3: Click Special Uninstall to open the application list as below.
Step 4: Click Windows Live Messenger and click Next.
Step 5: Follow a few onscreen instructions to complete the next two or three steps.Step 6: Restarting your computer is required to complete removal.
Uninstall ESET Smart Security 4
To uninstall ESET Smart Security 4 from the computer, the normal and direct way is to uninstall it with its own uninstaller. But after the uninstallation, it is necessary to delete some associated registry entries manually. We know that anti-virus programs always combine well with the operating system, if can’t be thoroughly uninstalled, there will be some following-up problems appearing, for example, impossible to get onto the system or difficult to reinstall the program.
But with Perfect Uninstaller in hand, there is no need to worry about such kind of problem when processing the removal. The Force Uninstall function will completely get rid of this program from the computer without nothing left down.
First, to successfully uninstall ESET Smart Security 4, it is necessary to get into windows safe mode to totally close all running programs, including the program you want to uninstall. Then you can Force Uninstall it with Perfect Uninstaller.
Method one: Uninstall it from the folder
1) Find its folder directly in the hard drives (mostly in C drive).
2) Click the folder and then select “Force Uninstall” to begin the removal.
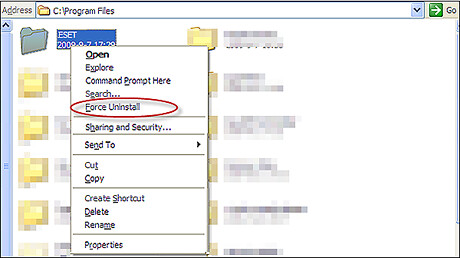
3) Click Next and then follow the on-screen steps to finish the uninstallation processes.
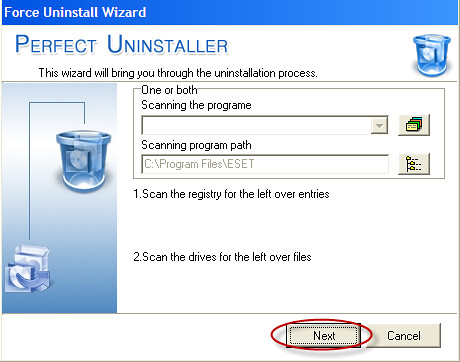
Method two: Uninstall it from Force Uninstall Wizard
1) Run Perfect Uninstaller
2) Click “Force Uninstall” on its main interface.
3) Click “OK” to skip the pop-up: First please try the “Uninstall” function!
4) Navigate the path of ESET Smart Security 4 into the second blank and click “Next” to begin the removal.


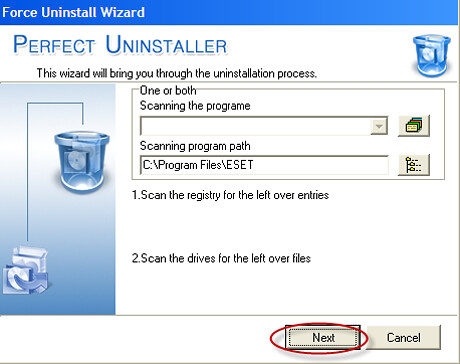
5) Click “Next” to begin the removal when Perfect Uninstaller has found all relating entries.
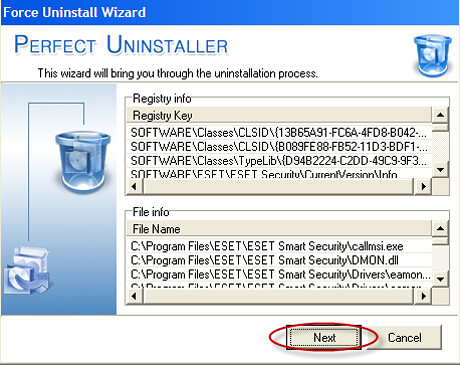
6) Last, follow the on-screen steps to finish the removal.
No matter which method you use to uninstall ESET Smart Security 4, after the process above, it will completely removed from the computer
But with Perfect Uninstaller in hand, there is no need to worry about such kind of problem when processing the removal. The Force Uninstall function will completely get rid of this program from the computer without nothing left down.
First, to successfully uninstall ESET Smart Security 4, it is necessary to get into windows safe mode to totally close all running programs, including the program you want to uninstall. Then you can Force Uninstall it with Perfect Uninstaller.
2) Click the folder and then select “Force Uninstall” to begin the removal.
3) Click Next and then follow the on-screen steps to finish the uninstallation processes.
2) Click “Force Uninstall” on its main interface.
3) Click “OK” to skip the pop-up: First please try the “Uninstall” function!
4) Navigate the path of ESET Smart Security 4 into the second blank and click “Next” to begin the removal.
5) Click “Next” to begin the removal when Perfect Uninstaller has found all relating entries.
6) Last, follow the on-screen steps to finish the removal.
No matter which method you use to uninstall ESET Smart Security 4, after the process above, it will completely removed from the computer
Uninstall Panda Internet Security 2009
To thoroughly uninstall Panda Internet Security 2009 from the computer, it is much better to uninstall it with a professional uninstaller, especially when it is incompletely uninstalled before or there is something corrupted. Otherwise, lots of leftovers will be left either in the PC drives or the registry, which blocks the successful installation of other programs.
With Perfect Uninstaller, you are provided very easy ways to uninstall this program from the computer: Uninstall and Force Uninstall. But no matter which method you select to use, please first boot the computer into safe mode to totally close all running programs before the removal.
Method one: Uninstall Panda Internet Security 2009
(Recommended when it is a full version)
1) Run Perfect Uninstaller.
2) Highlight Panda Internet Security 2009 and then click “Uninstall” button to begin the removal.
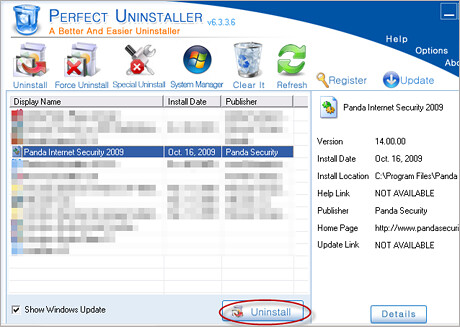
3) Follow the prompts to finish the removal.
Method two: Force Uninstall Panda Internet Security 2009
It is recommended to uninstall corrupted programs with Force Uninstall function for it allows users to directly uninstall programs from their directories. And during the uninstall processes, it will fully scan both the drives and the registry for associated entries. But when uninstalling Panda Internet Security 2009 please note that it always has two directories, which means that you need to Force Uninstall twice in order to fully get rid of it.
1)C:\Program Files\Panda Security
2)C:\Program Files\Common Files\Panda Security
A. Navigate to the C:\Program Files\Panda Security, right click the folder “Panda Security” and then select Force Uninstall to begin the removal.
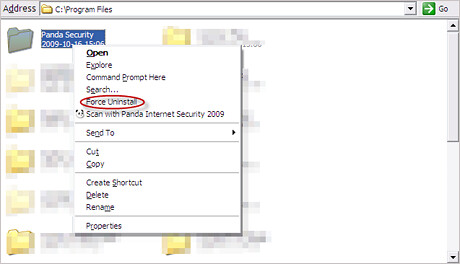

B. Click Next to proceed the removal when Perfect Uninstaller has found all associated entries.

C. Navigate to the C:\Program Files\Common Files\Panda Security, right click the folder “Panda Security” and then select Force Uninstall to begin the removal.
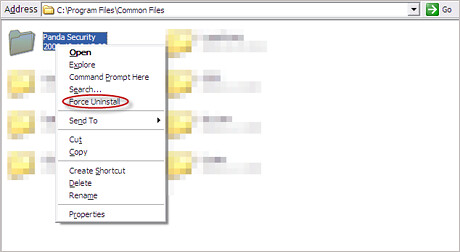

D. Perfect Uninstaller has found all related entries,click Next to continue.
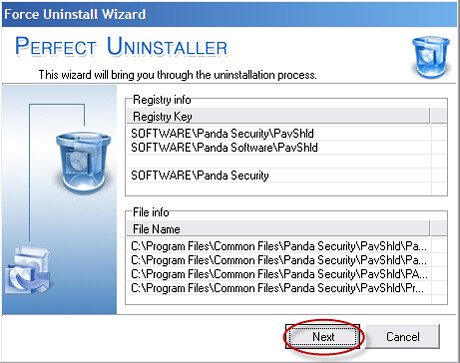
E. Follow the on-screen prompts to finish the removal.
By following the steps above, you can quickly uninstall Panda Internet Security 2009 within one or two minutes, even though it is a corrupted version
With Perfect Uninstaller, you are provided very easy ways to uninstall this program from the computer: Uninstall and Force Uninstall. But no matter which method you select to use, please first boot the computer into safe mode to totally close all running programs before the removal.
Method one: Uninstall Panda Internet Security 2009
(Recommended when it is a full version)
1) Run Perfect Uninstaller.
2) Highlight Panda Internet Security 2009 and then click “Uninstall” button to begin the removal.
3) Follow the prompts to finish the removal.
Method two: Force Uninstall Panda Internet Security 2009
It is recommended to uninstall corrupted programs with Force Uninstall function for it allows users to directly uninstall programs from their directories. And during the uninstall processes, it will fully scan both the drives and the registry for associated entries. But when uninstalling Panda Internet Security 2009 please note that it always has two directories, which means that you need to Force Uninstall twice in order to fully get rid of it.
1)C:\Program Files\Panda Security
2)C:\Program Files\Common Files\Panda Security
A. Navigate to the C:\Program Files\Panda Security, right click the folder “Panda Security” and then select Force Uninstall to begin the removal.
B. Click Next to proceed the removal when Perfect Uninstaller has found all associated entries.
C. Navigate to the C:\Program Files\Common Files\Panda Security, right click the folder “Panda Security” and then select Force Uninstall to begin the removal.
D. Perfect Uninstaller has found all related entries,click Next to continue.
E. Follow the on-screen prompts to finish the removal.
By following the steps above, you can quickly uninstall Panda Internet Security 2009 within one or two minutes, even though it is a corrupted version
How to Remove Norton Internet Security 2010 Completely
Have you ever encountered troubles with your Norton Internet Security 2010 and need to remove Norton Internet Security 2010? Sometimes when you update Norton Internet Security 2010 to the new version, your computer will encounter blue screen of death error. A very useful troubleshooting is to remove Norton Internet Security 2010. Such kind of blue screen of death error being caused by a Norton Internet Security 2010 update is symptomatic of a deeper issue and is probably because that update merely triggered something that was going to happen eventually anyway. How to remove Norton Internet Security 2010 completely from your computer? Want to remove Norton Internet Security 2010 with great ease?
The most conventional method is removal through the Add/Remove Programs Control Panel. You can follow the below instruction to remove Norton Internet Security 2010 within few steps:
1) Click on Start, Click on Control Panel.
2) Double-click on Add or Remo.
2) Double-click on Add or Remo.
3) Find Norton Internet Security 2010 product listed and click on it.
4) Click on Change/Remove.
5) Place a checkmark next to each Norton Internet Security 2010 product you wish to remove and click Remove.
5) Place a checkmark next to each Norton Internet Security 2010 product you wish to remove and click Remove.
6) A warning message will pop up, and then click on the Remove button.
7) .The removal process will start showing each program being removed, and then it will ask to restart the computer. Go ahead and reboot after the removal process is finished.
After rebooting, Norton Internet Security 2010 should be removed from your system. If for some reason, the normal uninstall does not remove it, now you need to try another path to completely remove Norton Internet Security 2010.
Is there any shortcut to take the easy way out? Is there a quick guide for you to remove Norton Internet Security 2010? Yes, of course! Perfect Uninstaller is your best option.
You can absolutely find out an uninstall program to help you automatically remove Norton Internet Security 2010 within few steps. Perfect Uninstaller not only completely uninstalls any unwanted application that standard Windows Add/Remove Program can’t remove in a better and easier way, but also cleans all registry entries and drivers that the applications left over..
Download and install Perfect Uninstall right now !
Thoroughly remove bearshare
With Bearshare, we can easily find, download, share, and publish audio and video files, which makes our life more colorful. Normally, a click on the Remove/uninstall button in the Add/Remove Programs list or its directory will uninstall it from the computer. But in some cases, it is a bit difficult to uninstall BearShare when it is not in the windows Add/Remove Programs utility or corrupted. Don’t worry, with Perfect Uninstaller in hand, you can relaxingly uninstall it with very easy ways.
Method one: Get rid of BearShare with Uninstall function
(Highly recommended when your Bearshare is a full version)
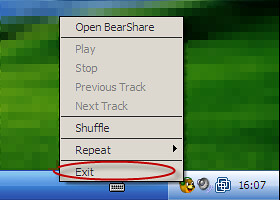
1)Quit BearShare from the right bottom of the computer.
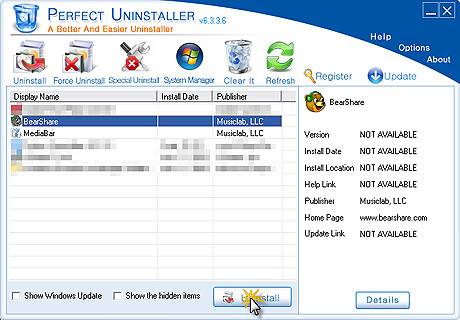
2)Run Perfect Uninstaller.
3)Click BearShare and then click “Uninstall” button to begin the removal.
4)Follow the on-screen prompts when BearShare is executing its own uninstall function.
5)Click Next when Perfect Uninstaller has found all associated entries.

6)Follow the on-screen steps to finish the removal of BearShare.
If a program you want to uninstall is not in the Display Name list, as long as it locates on the computer, Force Uninstall will help you quickly get it removed for it provides us a choice to directly uninstall programs from their folders. But when uninstalling Bearshare, please note that it always has two directories as what you can see below:
1)C:\Program Files\BearShare Applications
2)C:\Program Files\BearShareTb
So you have to Force Uninstall twice to thoroughly uninstall Bearshare from your computer.
Method two: uninstall BearShare with Force Uninstall function
(when the program is corrupted)
1)Navigate to the directory C:\Program Files\BearShare Applications, right click the folder and select “Force Uninstall” to begin the removal.


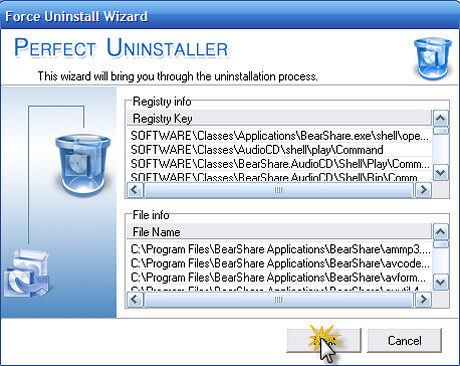
2)Click Next when Perfect Uninstaller has found all associated entries.
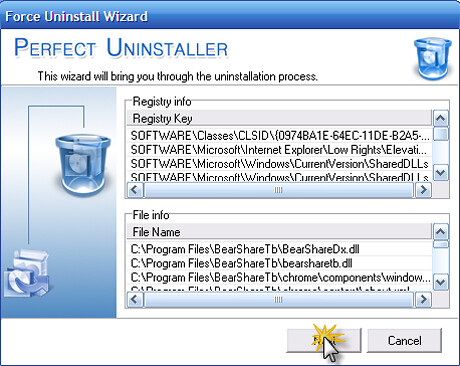
3) Navigate to the directory C:\Program Files\BearShareTb, right click the folder and select “Force Uninstall” to begin the removal.


4) Click Next to start the removal when Perfect Uninstaller has found all associated entries both in the drive and registry.
With the two methods above, you can easily uninstall BearShare from your computer, no matter it is a full or corrupted version.
Method one: Get rid of BearShare with Uninstall function
(Highly recommended when your Bearshare is a full version)
1)Quit BearShare from the right bottom of the computer.
2)Run Perfect Uninstaller.
3)Click BearShare and then click “Uninstall” button to begin the removal.
4)Follow the on-screen prompts when BearShare is executing its own uninstall function.
5)Click Next when Perfect Uninstaller has found all associated entries.
6)Follow the on-screen steps to finish the removal of BearShare.
If a program you want to uninstall is not in the Display Name list, as long as it locates on the computer, Force Uninstall will help you quickly get it removed for it provides us a choice to directly uninstall programs from their folders. But when uninstalling Bearshare, please note that it always has two directories as what you can see below:
1)C:\Program Files\BearShare Applications
2)C:\Program Files\BearShareTb
So you have to Force Uninstall twice to thoroughly uninstall Bearshare from your computer.
Method two: uninstall BearShare with Force Uninstall function
(when the program is corrupted)
1)Navigate to the directory C:\Program Files\BearShare Applications, right click the folder and select “Force Uninstall” to begin the removal.
2)Click Next when Perfect Uninstaller has found all associated entries.
3) Navigate to the directory C:\Program Files\BearShareTb, right click the folder and select “Force Uninstall” to begin the removal.
4) Click Next to start the removal when Perfect Uninstaller has found all associated entries both in the drive and registry.
With the two methods above, you can easily uninstall BearShare from your computer, no matter it is a full or corrupted version.
Subscribe to:
Posts (Atom)